
Adobe Photoshop is one of the most powerful image editing software available today, widely used in graphic design, photography, advertising, web design, and many other fields. However, for many beginners, Photoshop’s vast functionality and complex interface can be overwhelming. So, how can you go from a Photoshop novice to a proficient user?
In this article, I will introduce 10 essential Photoshop tips that will help you start from the basics, progress to mastering editing, and enhance your creativity and efficiency. Whether you are a graphic designer, photographer, or just someone looking to improve their personal image editing skills, these tips will greatly enhance your Photoshop experience.
1. Use Layers and Layer Groups to Manage Your Workflow
Tip Highlight: Layers are the core of Photoshop; mastering layer management is key to increasing your efficiency.
In Photoshop, layers are like transparent sheets stacked on top of each other to form the final image. With layers, you can edit each element individually without interfering with others. Learning how to efficiently use layers and layer groups will help you manage complex design files.
Steps:
- Create a New Layer: Use the shortcut Ctrl + Shift + N (Windows) / Cmd + Shift + N (Mac) to open the new layer dialog, or click the “New Layer” icon at the bottom of the Layers panel.
- Name and Organize Layers: Double-click the layer name to rename it. Use Ctrl + [ or Ctrl + ] (Windows) / Cmd + [ or Cmd + ] (Mac) to change the order of layers, keeping your workflow organized.
- Create Layer Groups: Select multiple layers and press Ctrl + G (Windows) / Cmd + G (Mac) to group them together for easy management.
Proper layer management helps you handle complex designs more efficiently, avoiding confusion and saving a lot of editing time.
2. Master the Quick Selection Tool and Magic Wand Tool
Tip Highlight: Selecting objects is the foundation of image editing. Mastering selection tools lets you edit images precisely.
Whether it’s removing backgrounds, adjusting colors, or creating masks, selection tools are essential. The Quick Selection Tool and Magic Wand Tool can help you quickly select specific areas or colors in an image.
Steps:
- Quick Selection Tool: Press W to activate the Quick Selection Tool. Click and drag your mouse to select the area you want to edit. Hold Alt (Windows) / Option (Mac) to subtract from the selection.
- Magic Wand Tool: Press W again to switch to the Magic Wand Tool. Click the color area you want to select. Adjust the “Tolerance” value to expand or reduce the selection range. The default tolerance is 32, which works well in most cases, but you can adjust it based on the image.
- Feather the Selection: Right-click the selection and choose “Feather” to soften the selection edges, making the transition between edited and non-edited areas smoother.
Efficient use of selection tools allows you to edit image areas with precision, improving both your design efficiency and quality.
3. Use Masks for Precise Image Adjustments
Tip Highlight: Masks enable non-destructive editing, allowing you to adjust parts of an image flexibly.
Masks are one of Photoshop’s most powerful features. With a mask, you can hide parts of an image instead of deleting them, preserving the original image data and allowing you to revert changes anytime.
Steps:
- Add a Mask: Select a layer, then click the “Add Layer Mask” button at the bottom of the Layers panel (a rectangle with a small circle inside). This will add a white mask to the layer, showing the entire content.
- Edit the Mask with Brush Tool: Press B to activate the Brush Tool. Paint with black to hide parts of the image and white to reveal them. Adjust the hardness, size, and flow of the brush for more detailed edits.
- Adjust Mask Opacity: You can adjust the opacity of the mask in the Layers panel to make the effect more subtle.
Non-destructive editing allows for flexible design changes without losing original image data.
4. Learn to Use Shortcuts for Faster Workflow
Tip Highlight: Mastering keyboard shortcuts is the fastest way to increase your Photoshop efficiency, saving you tons of time.
Photoshop has a vast array of keyboard shortcuts that allow you to perform tasks without reaching for the mouse, speeding up your workflow.
Common Shortcuts:
- Ctrl + Z (Windows) / Cmd + Z (Mac): Undo the last action
- Ctrl + T (Windows) / Cmd + T (Mac): Free Transform
- Ctrl + D (Windows) / Cmd + D (Mac): Deselect
- Ctrl + J (Windows) / Cmd + J (Mac): Duplicate Layer
- Ctrl + Shift + I (Windows) / Cmd + Shift + I (Mac): Inverse Selection
Mastering shortcuts allows you to be more efficient in editing, boosting your overall work speed.
5. Use Adjustment Layers for Color Correction

Tip Highlight: Adjustment layers let you non-destructively modify the image’s color, brightness, contrast, and more.
In Photoshop, adjustment layers allow you to modify various parameters of your image without altering the original image. Using tools like Levels, Curves, and Exposure, you can apply the perfect tone to your image.
Steps:
- Add an Adjustment Layer: Click the “Create new fill or adjustment layer” icon at the bottom of the Layers panel and choose Levels, Curves, or other options.
- Adjust Levels and Curves: Levels adjustment lets you change the brightness range of your image, while the Curves adjustment provides more precise control over brightness and contrast. The “point” in Curves represents different brightness levels, and moving them adjusts the exposure effect.
- Use Hue/Saturation Adjustment: Use the Hue/Saturation adjustment layer to change the overall color balance and saturation, making your image more vivid or muted.
Adjusting an image’s color and lighting non-destructively allows for greater control and a professional, polished final result.
6. Efficiently Use Filters and Blur Effects
Tip Highlight: Filters and blur effects can add creative elements to your image or fine-tune details.
Photoshop provides a rich filter library that can enhance your image quality or add unique effects. You can also use blur effects to smooth out certain areas or create a depth of field.
Steps:
- Apply a Filter: Go to the “Filter” menu and choose the desired filter, such as “Gaussian Blur,” “Sharpen,” or “Motion Blur.” Remember to duplicate your layer before applying filters, so you can always undo the effect.
- Adjust Blur Effects: Use the Blur Tool (shortcut R) to refine certain areas, or apply a “Lens Blur” to simulate shallow depth of field effects.
- Sharpen the Image: Use “Filter > Sharpen” to enhance the image details, especially useful for landscapes or portrait photos.
Filters and blur effects can add creativity and professionalism to your images, elevating your design quality.
7. Master Image Compositing
Tip Highlight: Compositing allows you to seamlessly blend multiple images to create stunning visual designs.
Image compositing is one of Photoshop’s most creative techniques. By combining multiple layers and adjusting the tone of each image, you can create complex and visually appealing compositions.
Steps:
- Add Multiple Images: Import different images and place them on their respective layers. Use layer masks to hide or reveal parts of the images.
- Adjust Layer Blending Modes: In the Layers panel, choose the appropriate blending mode like “Overlay” or “Soft Light” for better blending effects.
- Match Tones and Lighting: Use the Hue/Saturation and Brightness/Contrast layers to match the colors and lighting across all images to ensure they blend naturally.
Mastering image compositing allows you to create visually impactful artistic works that grab attention and increase your designs’ appeal.
8. Fully Utilize Vector Tools
Tip Highlight: Vector graphics ensure your design remains clear and professional at any size.
Photoshop’s vector tools help you create shapes and graphics that don’t lose quality when scaled, which is crucial for designs that need to be resized, such as logos and icons.
Steps:
- Use the Pen Tool to Create Paths: Press P to activate the Pen Tool. Click to create anchor points for your paths and drag to control the curves.
- Create Vector Shapes: Click the Shape Tool in the toolbar to choose shapes like rectangles, circles, or polygons. Hold the Shift key to maintain the shape’s proportions.
- Select and Adjust Paths: Use the “Path Selection Tool” (shortcut A) to select and adjust paths, altering their size and angles.
Mastering vector tools ensures your design remains sharp and scalable, making it perfect for all design applications, from small icons to large billboards.
9. Master the Retouching Tools
Tip Highlight: Retouching tools help you quickly remove imperfections and restore details in photos.
Photoshop offers powerful retouching tools like the Healing Brush, Content-Aware Fill, and Clone Stamp Tool to help you remove blemishes, unwanted objects, or repair old photos.
Steps:
- Healing Brush Tool: Press J to select the Healing Brush Tool. Circle the imperfection and drag it to a clean area for automatic blending and healing.
- Content-Aware Fill: Use the Rectangular Marquee Tool to select unwanted objects and press Shift + F5 (Windows) / Shift + Fn + F5 (Mac) to apply Content-Aware Fill, which automatically fills the selected area with surrounding pixels.
Retouching tools improve the image’s quality by removing imperfections and enhancing photo clarity, especially useful for portraits and product photography.
10. Learn Image Exporting and Saving Techniques
Tip Highlight: Properly exporting and saving images ensures they retain quality and are optimized for different platforms.
When you finish a design, it’s crucial to export and save the file correctly. Photoshop provides a variety of export options that allow you to optimize your images for web, print, or other uses.
Steps:
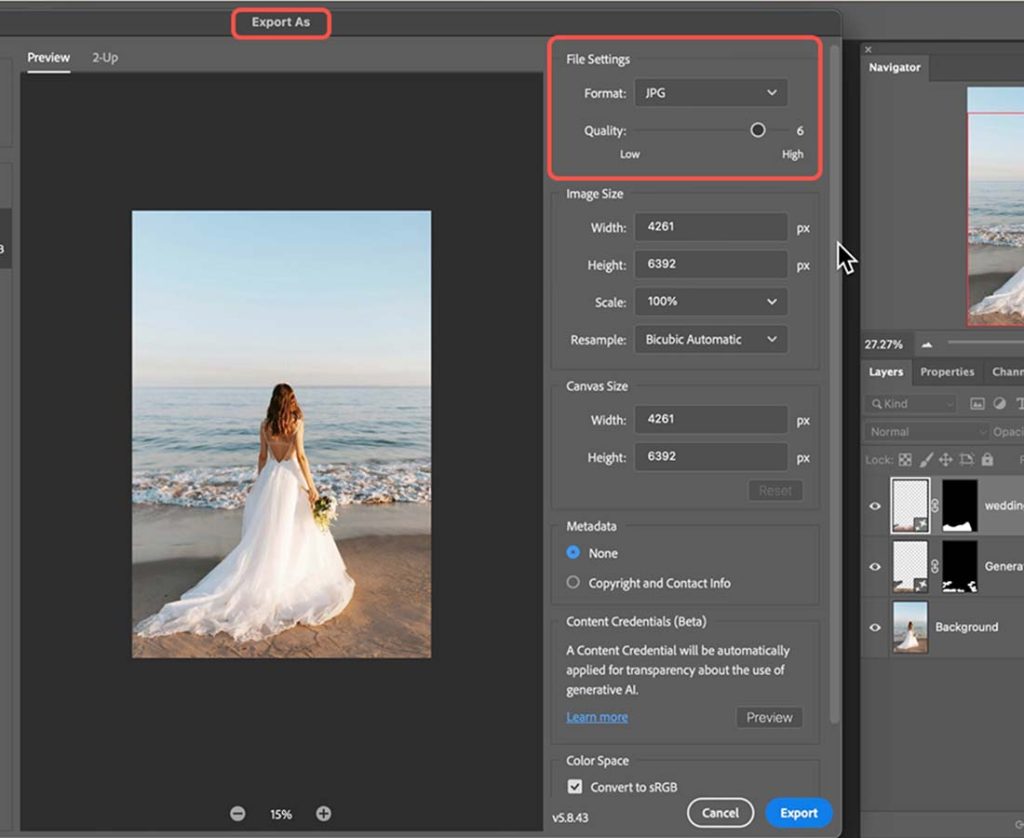
- Export the Image: Go to File > Export > Save for Web (Legacy) to choose web-optimized file formats like JPEG, PNG, or GIF. Adjust the resolution and image quality to ensure the image loads quickly and clearly on websites.
- Save High-Resolution Files: For print or high-quality designs, choose File > Save As and select a high-resolution format like TIFF or PSD.
Proper image exporting ensures that your images load faster and appear clearer on websites and social platforms, improving user experience.
By mastering these tips, you’ll go from a Photoshop beginner to a pro, able to handle complex design tasks more efficiently and professionally. Each tip helps you save time and elevate the quality of your final creations, unlocking your full creative potential. If you want to further enhance your Photoshop skills, consistent practice and exploration of these features will help you become a true design master!


+ There are no comments
Add yours